How to Use a Sourdough Proofing Basket: A Simple Step-by-Step Guide
How to Use a Sourdough Proofing Basket: A Simple Step-by-Step Guide
By the Exquisite Deals Team — the Exquisite Deals curation team hand-reviews every product it lists, comparing specs, value, and real buyer questions before recommending anything.
Quick Answer
To use a sourdough proofing basket, dust it well with rice flour, place your shaped dough seam-side up inside, cover it, and let it rise. The basket holds the loaf's round or oval shape and leaves those classic spiral rings on your finished bread crust.
Featured Product

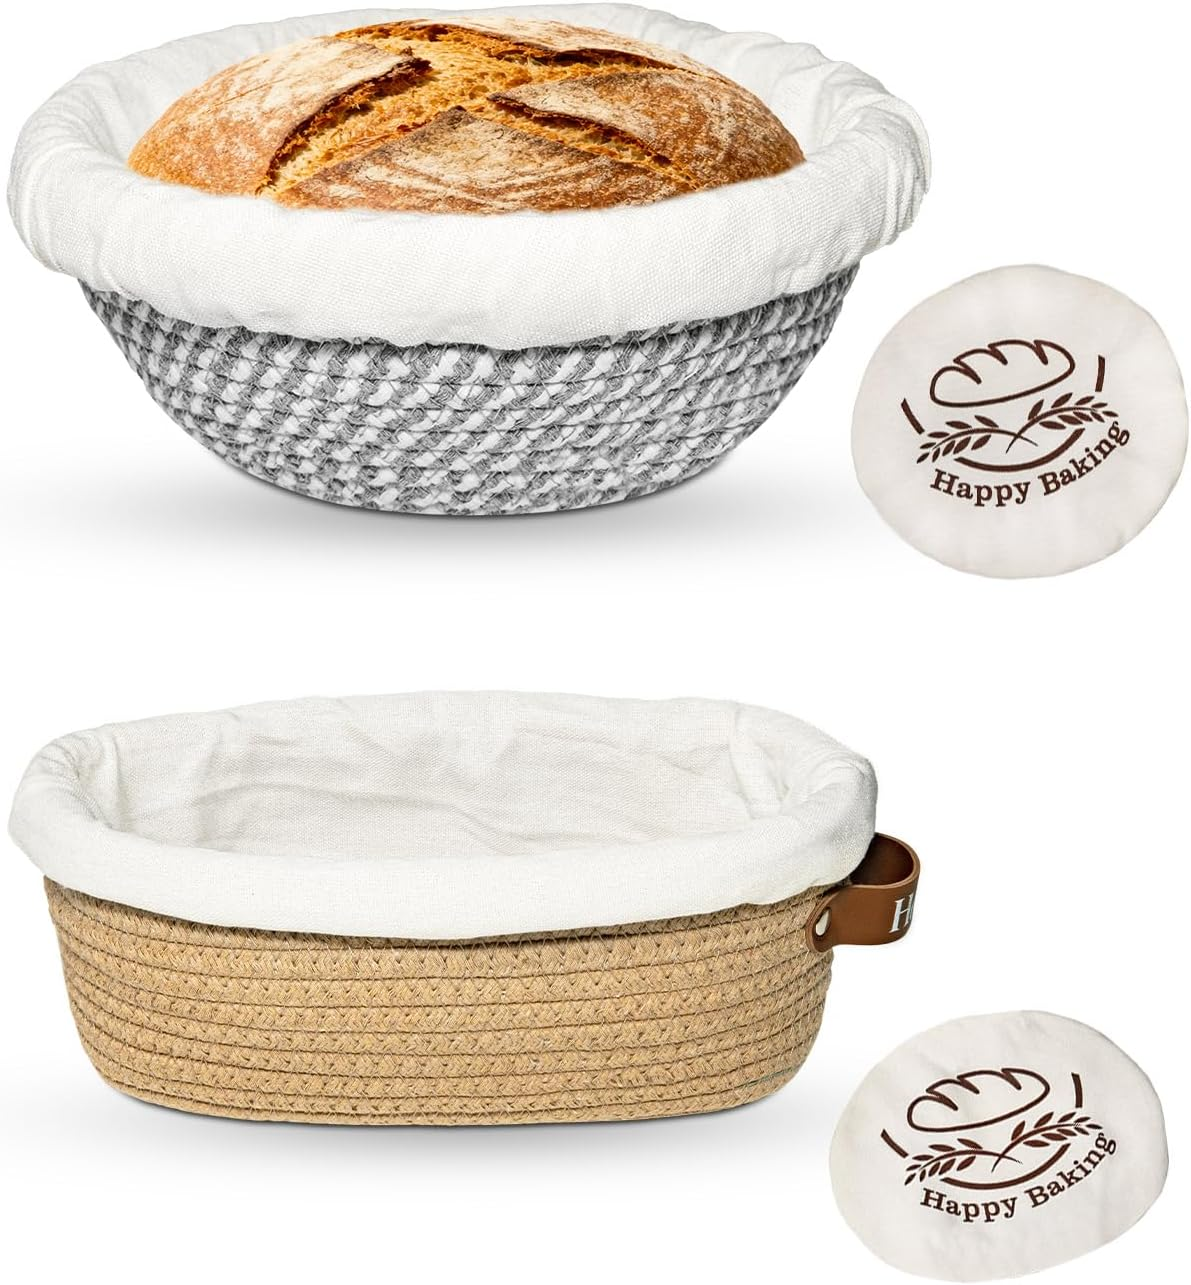
Sourdough Bread Proofing Basket Set - 9" Round & 10" Oval with Liners — a two-shape starter set that lets you bake both round boules and long oval loaves without buying two separate kits. Shop now →
Why This Matters
A sourdough proofing basket, also called a banneton, does two jobs at once. It supports the wet, slack dough that sourdough is famous for so the loaf holds a tall, round shape instead of spreading flat on the counter. It also wicks a little moisture from the surface of the dough, which helps you get a drier skin that crisps into a crackly crust in the oven.
If you have ever pulled a sad, pancake-shaped loaf out of the oven, the basket is often the missing piece. Learning how to use a sourdough proofing basket the right way is one of the fastest ways to make home bread look and feel like it came from a real bakery. The good news is the steps are simple, and once you learn them you will repeat the same routine every single bake.
Below we walk through everything in plain language: what you need, how to prep the basket so nothing sticks, the full proofing process, common mistakes, and how to keep your basket clean so it lasts for years.
What You Need Before You Start
You do not need a lot of gear to get started. Gather these items and keep them within reach so you are not scrambling with sticky hands:
- A proofing basket (banneton). Round for boules, oval for batards. A two-piece set covers both shapes.
- Rice flour. This is the secret weapon. Rice flour does not absorb moisture the way wheat flour does, so dough releases cleanly. Regular flour works in a pinch but sticks more.
- Your shaped dough. This guide assumes you have already mixed and shaped a sourdough loaf.
- A clean tea towel or the liner that came with your basket, for covering the dough while it rests.
- A little space in the fridge if you plan a slow, cold overnight proof.
That is it. No special tools, no gadgets. Just flour, a basket, and a bit of patience.
Step-by-Step: How to Use a Sourdough Proofing Basket
Step 1: Season a New Basket First
A brand-new banneton needs a quick break-in so the coils absorb a thin layer of flour. Lightly mist the inside with water, then dust it generously with rice flour, pressing the flour into the grooves with your fingers. Tap out the loose excess. This first seasoning creates a natural non-stick surface. You only do this once when the basket is new.
Step 2: Flour the Basket Before Every Loaf
Before each bake, sprinkle a solid, even coat of rice flour across the whole inside of the basket, including the walls. Do not be shy here. A thin dusting is the number one cause of stuck dough. If your basket has a cloth liner, flour that too. Give the basket a gentle shake so the flour settles into every ring and coil.
Step 3: Place the Dough Seam-Side Up
After you shape your loaf, it will have a smooth top and a seam where you pinched it closed on the bottom. Lower the dough into the basket with the seam facing up and the smooth side facing down into the coils. This matters: when you flip the loaf out onto your baking surface later, the smooth side becomes the top of your bread and the pretty spiral pattern shows.
Step 4: Cover and Proof
Cover the basket loosely with a tea towel, the included liner, or a large bowl so the dough does not dry out or form a skin. Now let it rise. You have two common paths. A room-temperature proof usually takes one to three hours until the dough looks puffy and springs back slowly when poked. A cold proof in the fridge runs eight to sixteen hours and builds deeper flavor while making the dough easier to score.
Step 5: Do the Poke Test
To check if the loaf is ready, press a floured finger gently into the dough about half an inch. If the dent springs back slowly and leaves a slight mark, it is ready to bake. If it springs back instantly, it needs more time. If it does not spring back at all and the dough feels slack, it may be over-proofed, so bake it soon.
Step 6: Turn Out and Bake
When you are ready, turn the basket over onto a piece of parchment or your baking surface in one confident motion. The loaf should drop out cleanly thanks to all that rice flour. Score the top with a sharp blade and bake as your recipe directs, usually in a hot Dutch oven. That flour-dusted, ringed surface is now the top of a beautiful, bakery-style loaf.
Common Mistakes to Avoid
Most proofing problems come down to a handful of easy-to-fix habits. Watch out for these:
- Not enough flour. The single biggest reason dough sticks. When in doubt, add more rice flour.
- Using only wheat flour. All-purpose flour absorbs moisture and turns pasty. Rice flour releases far better.
- Placing dough seam-side down. This flips your loaf the wrong way and hides the pattern.
- Skipping the cover. An uncovered loaf dries into a tough skin that will not expand or score well.
- Washing the basket with soap after every bake. Soap and soaking damage the rattan and invite odors. Dry-clean it instead.
- Over-proofing. A loaf left too long collapses and bakes dense. Use the poke test rather than the clock alone.
Care & Maintenance Tips
A proofing basket is a long-term tool, and treated well it can last for many years. The key rule is to keep it dry. After each bake, let the basket air out completely, then knock out the loose flour by tapping it upside down or brushing it with a dry pastry brush. Do not run it under water for routine cleaning.
If dough bits dry and crust onto the coils, wait until they are fully hardened, then flick them off with a stiff dry brush or a wooden skewer. Only do a deeper clean if you see the beginnings of mold, which happens when a basket is stored damp. In that case, rinse briefly with a little water and a splash of white vinegar, then dry it thoroughly in a warm, airy spot or a low oven for a few minutes before storing.
Store your banneton somewhere with good air flow, not sealed in a plastic bag or an airtight container where trapped moisture can breed mildew. A cupboard shelf or open rack is ideal. If your set came with washable cloth liners, those can be shaken out and machine-washed occasionally, which is a nice bonus for anyone who wants an easier cleanup routine.
Our Pick
For most home bakers, a two-shape set is the smart way to start. The Sourdough Bread Proofing Basket Set pairs a 9-inch round basket for classic boules with a 10-inch oval for longer batard loaves, and it includes cloth liners for easy-release proofing and simpler cleanup. Having both shapes on hand means you can match the basket to the recipe instead of forcing every loaf into one mold. It is a practical choice whether you are baking your very first sourdough or leveling up a weekend habit into something you do every week.
Frequently Asked Questions
Do I need to soak a new proofing basket before using it?
No soaking is needed. Just lightly mist a new basket with water and rub in a generous coat of rice flour to season it once. Soaking a rattan basket can warp it and slow drying, which risks mold.
Why does my dough keep sticking to the basket?
Almost always too little flour, or the wrong flour. Use a heavy, even coat of rice flour on every surface before each loaf. Rice flour resists moisture far better than wheat flour and releases the dough cleanly.
Can I proof dough in the fridge inside the basket?
Yes, and many bakers prefer it. A cold overnight proof of eight to sixteen hours develops flavor and firms the dough so it scores more easily. Just cover the basket so the surface does not dry out.
How do I clean a sourdough proofing basket?
Dry-clean it. Let it air out, tap out loose flour, and brush off dried bits with a stiff dry brush. Avoid soap and soaking for routine care. Only rinse with a little water and vinegar if mold appears, then dry it fully.
What is the difference between a banneton and a brotform?
Very little in practice. Banneton is the French term and brotform is the German one, and both describe the same style of coiled proofing basket. Round versions shape boules while oval versions shape batards.
How long does dough proof in the basket?
At room temperature, usually one to three hours until puffy and slow to spring back. In the fridge, eight to sixteen hours. Times vary with your kitchen temperature and how active your starter is, so trust the poke test over the clock.
Can I use a proofing basket for non-sourdough bread?
Absolutely. Any yeasted or no-knead artisan loaf that benefits from shape support and a crisp crust works well in a banneton. The same flouring and proofing steps apply.
Key Takeaways
- Flour the basket generously with rice flour before every loaf to stop sticking.
- Place dough seam-side up so the smooth, patterned side ends up on top.
- Always cover the dough while it proofs, whether at room temperature or in the fridge.
- Use the poke test to judge readiness instead of relying only on time.
- Keep the basket dry and dry-clean it; skip soap and soaking to make it last.
Related Resources
Fitting out a small or busy home? These honest guides pair well with a sourdough setup: our look at the best portable washing machines for small spaces, our tub faucet hose buying guide for easy kitchen and bath upgrades, and our roundup of the best sunrise alarm clocks for waking up in time to start the dough.
Ready to Bake Better Bread?
Ready to find the right fit? Explore Exquisite Deals' Kitchen collection and shop the deal at exquisite-deals.shop.